
Saturday, September 28, 2013
COMPUTER DRAMA
Hey everyone, hope you have all had a good week. So... we're having some computer issues here at the moment and by the looks of things it won't be fixed until late this week, most likely Thursday or Friday. Unfortunately this means I'm unable to share with you all the new creations that I had intended to post this week. I'm actually using my mobile at the moment as I felt I should let you know what was happening. So hopefully, all the drama will be sorted out asap and then I can get back to blogging and sharing my work with you. I hope you have a great weekend!
Monday, September 23, 2013
JUST A QUICK SHARE
Hi! Hope everybody had a good weekend? I sure did, had lots of fun creating this weekend so I'll have a lot to share later in the week but for the moment I thought I'd just share with you a new layout I made of my mom. I uploaded this to scrapbook.com on Saturday but I didn't quite get around to adding it on here.
I love this photo of my mom. She is so beautiful but she rarely lets anyone take pictures of her and hides if you try, so it can be really hard to get good photo's of her. I took this one at the local foreshore when I was 19. Mom and I had gone up there together for dinner. We sat on the beach and ate fish and chips, then went for a walk together along the foreshore. It was nice just spending that time just me and her.
I've used a lot of different products on here again MME, Prima, AC, Kaisercraft, Stuido Calico, Echo Park and Teresa Collins to name a few. All of my favorite brands. Though there are definitely more on there that have escaped my memory for the moment.
'Happy Day'

Lots and lots of fun making this one. Now I wish I could claim credit for the idea of painting a bow on my page, but I can't. I have seen quite a few artists lately who have taken to hand painting designs on there pages, but unfortunately at the moment I cannot for the life of me remember the names of the these wonderful artists nor which sites I have seen ideas similar to this on. So I do apologize and when I get some more time I'll look into and let everyone know as well as add links to the sites.
Here are some close-ups for you:

Lots and lots of layers here. The white flower button is probably one of my favorite embellishments on here I just poked the wire stem of the little yellow flower through the holes and then curled out at the side. Surprisingly I've had this button since I first started scrapbooking more than 5 years ago, sitting in a little jewellery box in my room, and I never thought to use it, I wasn't even sure I liked it. But I'm glad I found it and decided to use it for this page.

I love the little stripey arrow by Studio Calico pointing in at my sideways banners here. Its really cute and of course this just wouldn't be the same without these beautiful Prima flowers!!

I know I frame nearly all my photos in twine but I can't help it... lol! My pages just don't feel right to me without it. I also really love at the moment the combination of the waxed twine and bakers twine. It gives such a fun feel to the page. I've layered the Studio Calico speech bubbles up the top and the word love and the postcard were both cut out from a Teresa Collins piece of paper which I've layered with a button between.... I know... but I ran out of foam tape and it was all I could think to use and it worked. The die-cut bracket is from Kaisercraft.

More gorgeous cork from Studio Calico, Prima tile and MME enamel dots. You can really see here a lot of the different textures and the dimension of this page.

I painted the bow using Winsor and Newton watercolor paints. I love the texture of the bow and the chevron masking it really shows with all that ink, mist and paint. The Happy Day chipboard I used for my title is MME and I've added the bows underneath with a flower, Collections Elements butterfly and some more enamel dots.
So that's it from me today. But as I said at the beginning I'll have lots more to share with you later this week, including pages from my Art Journal, more Layouts, Tags, and maybe even a card (I'm about to go and try my hand at card making... Wish me luck!!).
I hope I have helped you to find some yummy inspiration today! Have a good week everybody.
Thanks for stopping by! xoxoxo!!
Friday, September 20, 2013
STORMY DAY TAGS
Hey everyone! I'm so tired of rain. It's been non-stop for months now, and it's been super windy and stormy here the last few days. Being stuck inside the house gave me the idea to give tag making a go. Now believe it or not I've never done this before... I've never made cards either.... But I had a lot of scrap paper lying around and here is what I came up with


'US'

I stamped the butterflies then painted with watercolours before cutting out.
'Best Memory'

'Wishes'

'You'

I actually had a lot of fun setting this up to photograph. The book wasn't originally going to be a part of the photo it was just to stand my tags up against. I had nothing else to use so I used the book I was reading. A fifty year old copy of The Lord of the Rings. It's a great book but slow reading as it uses quite old fashioned English and can be hard to follow, but still very hard to put down.
So what did you think? Not bad for a first go hey? I might even decide to give card making a go next! Well, I guess that's it from me for now, but there will be more early to mid next week. Still got lots to share some more tags and new layouts, maybe even a card or two. I hope you all have a great weekend, and lots of sunshine! Maybe I'll even get lucky and have some clear skies this weekend. Goodnight everybody xoxo!
Wednesday, September 18, 2013
FUN, NEW MIXED-MEDIA LAYOUT
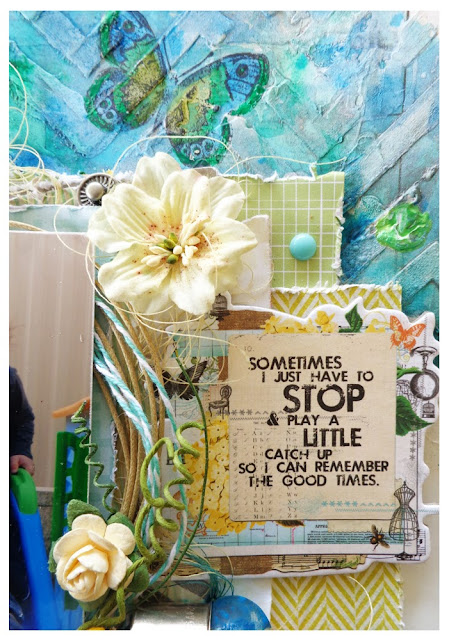
Hi everyone! Hope you've had a good week so far. I've been really busy creating and I thought I'd share with you a new mixed-media layout I created.
For the background I have used a combination of Mists and Acrylic Inks, Ranger Liquid Perfect Pearls, Texture Paste, Gesso, Stazon Ink in Jet Black with a Kaisercraft butterfly stamp, Winsor and Newton Watercolor paints, and of course my favorite Prima chevron stencil!


For the background I have used a combination of Mists and Acrylic Inks, Ranger Liquid Perfect Pearls, Texture Paste, Gesso, Stazon Ink in Jet Black with a Kaisercraft butterfly stamp, Winsor and Newton Watercolor paints, and of course my favorite Prima chevron stencil!
'YOU'

I had so much fun creating this, I'd never actually thought to use my watercolors when scrapbooking before, I usually just make and mix inks, but going through a box on the weekend I dug out all my old paints (watercolors among them) and thought to myself, 'Why not give these a try on here?' So I did and I love the way this page turned out. So bright and fresh.... Perfect for Spring!!
Here are some close-ups:

Lots of layers on here. Papers flowers ribbon and fibres..... Such a yummy mix!

Here you can see my stamped and painted butterfly, along with some of the awesome background texture. The little twin bike at the bottom of the photo I cut from a piece of paper by Teresa Collins and I like the touch of just that little something extra it gives to my page.

Love this layered chipboard piece from MME. I've had it for a couple of years now, and I used it on a page a long time ago but unfortunately my son jet got into my albums and destroyed a few of y older pages tearing and drawing on them, so I decided to recycle the embellishments, the photos however were not able to be saved, though thankfully I have copies.

You can see here how I've added waxed and bakers twine's in behind the photo as well as loose cotton for added texture all my paper were either distressed with a tool, or torn.
Once again I made the flag, designed it on the computer then printed it out.

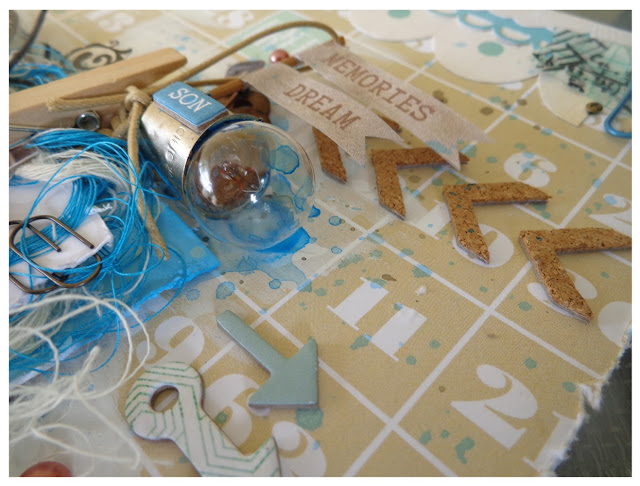
I would have to say that this photo is one of my favorites for this layout, the Ink on the Tim Holtz light bulb and the texture in the ribbon, flowers and background. Everything just came together really well. And don't you just love this light from Prima's Shabby Chic Metals? I know I do!!

I've had this chipboard from MME sitting around for so long but I could never really think of a use for it until now, and I'm glad I kept it for so long, not sure it would have been the same without it. I finished of the page with a few enamel dots, paper clips and some Prima Junkyard findings.
Well that's it from me again today, but I have some more to share soon. Hopefully I'll get it loaded up for you Friday but if not then it will be early next week.
Hope you found some inspiration, and that you a fantastic and creative week. Xo!
Tuesday, September 17, 2013
NEW PAGES AND FIRST EVER TUTORIAL
Hey guys sorry I'm late sharing this with you. I had hoped to get it uploaded early last week, but my boy has been sick so there just hasn't been time. I have 2 new pages to share with you today. One never before seen page and another which I have completed a tutorial for you on. Now I've never done one of these before so mostly it was just guess work and I apologize for the poor quality on some of the photos as it was nighttime when they were taken and lighting was very poor. However I do hope it gives you an outlook into my creative process. I'm not much of a planner and I do things in any order so if things seem a bit backwards, its just the way I work. I hope you enjoy and find lots of ideas and inspiration today.


Next up I have my tutorial to share with you. Now like I said at the beginning of the post I've not done one of these before so a lot of it is guess work, but hopefully its okay. Feel free to leave some comments and let me know what you think of it, and once again, I do sincerely apologize for the poor quality of some of the photos. It was dark when some were taken and unfortunately I couldn't get good enough light in the house.

The main products I used on here were Teresa Collins, AC, and MME, with a bit of Echo Park, Bo Bunny and Kaisercraft.
Some close-ups for you

To make the flag I cut to words from a die-cut piece of card from Authentique, and glued to a skewer. Lots of layers of paper and material here.

This cute little camera motif was cut from a piece of paper in the Chalk it up collection by MME.

Kindy Glitz on the pegs (butterflies too) and the little yellow rose I made from the same patterned yellow paper underneath.

Lots of background texture. I'm actually really happy with the way this page turned out as its really quite different from what I normally do and it was lots of fun to make.
Here's how I created this page. Hope it will inspire you to get creative.
Step 1: I've chosen to use a wood-grained patterned paper from the Family Stories collection by Teresa Collins. Using a brick mask spread texture paste onto you background. I normally try to create a triangle shape with my mask around the page. Sorry I know this is a little hard to see.

Step 2: Spray mist in a cream color over the whole page, then unscrew cap and use a paint brush dipped in the ink to paint some of the bricks (no need to paint them all). Add some drips from the same mist over the page. Next add flicks all over the page using 2 different colors of blue mist, one lighter one darker, and using the darker one add some random big splats. Also flick a chocolate brown mist and use a brush to highlight the edges of randomly chosen bricks. Don't worry if your page warps.
Step 3: Lightly press a grid stamp from Kaisercraft into Black Stazon Ink and lightly press here and there on your page. Repeat this step again using a script stamp. I've used one from Prima. Just try and remember that you don't want a full or clear image. I've also used the back of a clear stamp pressed in ink to stamp my page. This is how I achieved the blocks of black ink.

Step 4: Choose the papers you wish to use for you photo mat. I've used 4 to start. Two I have cut into a large banner shape one smaller than the other overlapping then add another 2 pieces on top to add some extra dimesion.
Step 5: I also started embellishing the top my page at this point as I rarely do anything in a specific order. I started by tearing a piece of paper about half the width of the page, which I have glued slightly off center and then overlapped with a longer but much thinner strip of paper. Next I rolled up a piece of paper which I wrapped with twine and embellished with a button and glued this horizontally across the papers at the very top of my page. To finish off I added a bow and an arrow pointing down underneath. Finish the top with some pearls and washi tape.

Step 6: I usually build up the layers for my photo separately from my main layout. Begin by cutting out a kaisercraft acetate frame and gluing a circle of waxed twine on top, do not cut the twine though. Make sure you leave enough to continue the circle a few more more times. Tear a piece of paper to match the top of your page and glue this on top of you twine circle. Add calico and your photo, then continue to wrap the twine in a circle around the top of your photo. use a bakers twine in black and white and do this again a couple of times. Once this is secure add a layer of buttons to the twine at the bottom right of your photo and a peg to help hold it all together.

Step 7: Glue your now ready photo to your page on top of your paper allowing the banner to peak and add some washi tape.

Step 8: Using the 2 left over triangles from your banner layer them on the left side of your page. Fold up some twine to match what you used at the top of your page and stick a chipboard heart and saying on top place this on the triangles and add some washi tape with a chipboard butterfly on top (The next photo doesn't actually show thew washi tape as I pulled the butterfly off and added it after I had already taken the photograph). On the same side of the page, tuck behind the photograph at the bottom a fabric ticket and a pen nib.
Step 9: On the opposite side of the page add a flag, you can make one yourself like I did, it's really simple, or you can use a pre-made one. tuck the end of the stick under your button so the flag itself sits up near your washi tape. Add a little lightbulb underneath and another fabric motif, I've used a camera. Add some more butterflies flying up your page, some gems and a brad to the very right of the layout.

Step 10: Add some more embellishments to you page. I've added a second little peg beneath the big one and tucked a little handmade flower on top with a yellow right angled arrow coming down beside the camera before turning towards the photo.In the top left hand corner I've used some foam tape to mount a picture of a hot air balloon which I cut from paper and added a button behind. I added some layered buttons beneath the chipboard heart too. I made a second flag with the word treasure on it to use for my title which I've placed on the opposite side of the photo. Finish embellishing by adding a little cutout camera motif, safety pins, paper clips and more gems randomly placed around the page.
Step 11: Use a light blue mist, a chocolate mist, and a paintbrush to add highlights and shadows behind your papers and embellishments. Use both colors to build the depth. Finish off your page by randomly brushing some gesso over your embellishments and papers.

Well that's it from me today. I hope you find some inspiration on here to create something fun and unique for yourself.
I've been really busy creating lately so I'll have more to share with you very soon. Have a good week and thanks for visiting. xo!
I think I will share with you my new layout first and then move on to the tutorial.
For the background I've used Kraft cardstock and paper from Teresa Collins collection Family Stories. I absolutely love the papers from this collection they are gorgeous. Other paper and products include AC, Echo Park, Tim Holtz and some Prima Junk Yard findings.
'Playing in the Sand & Sun'

Some gesso scraped on the background with ink splatters and some stamping, thought I'd stick with simple to see if I could scrap faster no such luck. I still spend hours and sometimes days on my pages... Lol!!
As you can see I thought I'd try something a little different behind my photo. Nothing major but along with my usual calico I've cut and folded up very long pieces of cotton which I've then messed up and added being the photo. I love the effect this gives and the bright blue cotton really adds a little something to the page.
Here are some close-ups.

The flag here I made. First I cut the flag shape out of some yellow paper and glued it ti skewer then I wrapped washi tape around it and cut the word 'loved' out of a piece of Echo Park paper and stuck it on. I finished it off by outlining in a black pen and wrapping some waxed twine around the post. It was super quick and simple to make and a great addition to my page.

I absolutely love these cork chevrons by Studio Calico, I would use them on absolutely everything if I could. They look so fantastic and have such great texture.
The title was done with Glitz alphas I love the boldness of the black on the soft cream and blue striped background. I outlined in black pen to help it stand off the page.

Studio Calico and Echo Park arrows, with the Tim Holtz mini paper clips and the chunky light bulb. You can see a lot of the different textures on the page here. Including a really good shot of the blue cotton. The flags here I found on google images and I printed them out before once again gluing to a skewer and adding twine.

These photos I have of my son playing outside when we first moved in are some of my favorite. I'd never really let him dig in dirt before mainly because there had been nowhere at our old house to do so, and seeing how curious, excited and happy was, totally melted my heart. I felt so guilty when it was time to go inside and clean up, and now we have grass so unfortunately no more digging except at the beach.
Lots of layers made from materials, paper and waxed twine (fantastic stuff!!). I finished the page off with a few copper pearls from Kaisercraft.
This is probably one of the first pages I have made in a very long time that doesnt have at least one flower on it somewhere and I'm really happy with the way it turned out!!
Next up I have my tutorial to share with you. Now like I said at the beginning of the post I've not done one of these before so a lot of it is guess work, but hopefully its okay. Feel free to leave some comments and let me know what you think of it, and once again, I do sincerely apologize for the poor quality of some of the photos. It was dark when some were taken and unfortunately I couldn't get good enough light in the house.
Here is the finished product:
'Treasure'

The main products I used on here were Teresa Collins, AC, and MME, with a bit of Echo Park, Bo Bunny and Kaisercraft.
Some close-ups for you

To make the flag I cut to words from a die-cut piece of card from Authentique, and glued to a skewer. Lots of layers of paper and material here.

This cute little camera motif was cut from a piece of paper in the Chalk it up collection by MME.

Kindy Glitz on the pegs (butterflies too) and the little yellow rose I made from the same patterned yellow paper underneath.

Lots of background texture. I'm actually really happy with the way this page turned out as its really quite different from what I normally do and it was lots of fun to make.
Here's how I created this page. Hope it will inspire you to get creative.
Step 1: I've chosen to use a wood-grained patterned paper from the Family Stories collection by Teresa Collins. Using a brick mask spread texture paste onto you background. I normally try to create a triangle shape with my mask around the page. Sorry I know this is a little hard to see.

Step 2: Spray mist in a cream color over the whole page, then unscrew cap and use a paint brush dipped in the ink to paint some of the bricks (no need to paint them all). Add some drips from the same mist over the page. Next add flicks all over the page using 2 different colors of blue mist, one lighter one darker, and using the darker one add some random big splats. Also flick a chocolate brown mist and use a brush to highlight the edges of randomly chosen bricks. Don't worry if your page warps.
Step 3: Lightly press a grid stamp from Kaisercraft into Black Stazon Ink and lightly press here and there on your page. Repeat this step again using a script stamp. I've used one from Prima. Just try and remember that you don't want a full or clear image. I've also used the back of a clear stamp pressed in ink to stamp my page. This is how I achieved the blocks of black ink.

Step 4: Choose the papers you wish to use for you photo mat. I've used 4 to start. Two I have cut into a large banner shape one smaller than the other overlapping then add another 2 pieces on top to add some extra dimesion.
Step 5: I also started embellishing the top my page at this point as I rarely do anything in a specific order. I started by tearing a piece of paper about half the width of the page, which I have glued slightly off center and then overlapped with a longer but much thinner strip of paper. Next I rolled up a piece of paper which I wrapped with twine and embellished with a button and glued this horizontally across the papers at the very top of my page. To finish off I added a bow and an arrow pointing down underneath. Finish the top with some pearls and washi tape.


Step 7: Glue your now ready photo to your page on top of your paper allowing the banner to peak and add some washi tape.

Step 8: Using the 2 left over triangles from your banner layer them on the left side of your page. Fold up some twine to match what you used at the top of your page and stick a chipboard heart and saying on top place this on the triangles and add some washi tape with a chipboard butterfly on top (The next photo doesn't actually show thew washi tape as I pulled the butterfly off and added it after I had already taken the photograph). On the same side of the page, tuck behind the photograph at the bottom a fabric ticket and a pen nib.
Step 9: On the opposite side of the page add a flag, you can make one yourself like I did, it's really simple, or you can use a pre-made one. tuck the end of the stick under your button so the flag itself sits up near your washi tape. Add a little lightbulb underneath and another fabric motif, I've used a camera. Add some more butterflies flying up your page, some gems and a brad to the very right of the layout.

Step 10: Add some more embellishments to you page. I've added a second little peg beneath the big one and tucked a little handmade flower on top with a yellow right angled arrow coming down beside the camera before turning towards the photo.In the top left hand corner I've used some foam tape to mount a picture of a hot air balloon which I cut from paper and added a button behind. I added some layered buttons beneath the chipboard heart too. I made a second flag with the word treasure on it to use for my title which I've placed on the opposite side of the photo. Finish embellishing by adding a little cutout camera motif, safety pins, paper clips and more gems randomly placed around the page.
Step 11: Use a light blue mist, a chocolate mist, and a paintbrush to add highlights and shadows behind your papers and embellishments. Use both colors to build the depth. Finish off your page by randomly brushing some gesso over your embellishments and papers.

Well that's it from me today. I hope you find some inspiration on here to create something fun and unique for yourself.
I've been really busy creating lately so I'll have more to share with you very soon. Have a good week and thanks for visiting. xo!
Friday, September 6, 2013
CATCH UP!!
First up I'm going to show you one of my older projects. I actually took about a year off scrapbooking after our house burned down at the end of 2011, having lost most of my supplies it was a while before I could build up my stock enough to start scrapping in earnest again.I hope you find lots of inspiration on here today.
Such a handsome little boy

Mixed brands as usual, including Tim Holtz, MME, Basic Grey, Kaisercraft, and lots of Prima.
For The background I tore strips of paper, scrunched them and glued them before wiping Vintage Photo Distress Ink over the top and spraying with water and mist which I let drip and flicked randomly.
Here are some close-ups:

My title was made using Jilli Bean Soup Alphas, I absolutely love them they look great and are definitely my all time faves!!!

The photo mat and the smaller blue banner behind it, both of which are on the blue patterned paper from Kaisercraft , and also these 2 chevron arrows were actually cut from some old paint swatches. I loved the brightness of them and all so the shiny and soft texture of them. Here you can also see some of that background texture created using a combination of torn and scrunched paper, distress ink, mist and dabs of texture paste added directly to the page in no particular order.

The branch on this page I actually made myself. I started by folding and wrapping gold wire together, making sure to add side branches, before wrapping the entire thing with washi tape then inking with distress inks and spraying with mist. I also left out a few pieces of the gold wire which I coiled as you can see in the photo above. I wasn't sure how it would turn out, but the end result was perfect for what I wanted to achieve and looks fantastic on this page.
Next up I thought I'd share with you the layout that I've used a section of in my blog header. I spent a really long time on this layout as I experimented with quite a few different techniques and some products I've not used before. I really love what I created though and I hope that it can inspire you too. The background for this layout was done entirely by hand on plain white cardstock. I fiddled with it for days, adding things, painting over things with gesso in an attempt to cover up parts I didn't like, before I was finally happy with it and moved on to the rest of the page.
Baby got blues

Lots of different brands again.... Echo Park Paper Co, Prima Flowers, Pink Paislee, MME and American Crafts, just to name a few!!
Here are some close-ups for you:

I love layering papers and embellishments. I get frustrated if my pages don't get at least a half inch in height.... LOL!!!! I made the pinwheels, a first for me, and I added MME enamel dots to the centers of each. The pinwheel shown in this photo I have sitting atop a AC speech bubble, that I couldnt figure out another use for, and I've cut out chipboard arrows, covered with patterned paper and layered.

Here you can see my title which I've outlined with gesso, using the edge of an old credit card. At the bottom of the page I've layered half of a Prima paper flower over a larger orange flower and added a button and thread with the little mushroom brad next to it. You also see here some of my background. The chevron stencil that I used on here I actually made myself as I couldn't find one at the time and I dried my texture paste with a heat gun so it would bubble up for more texture. I've also stencils different colored circles, stamped orange, blue and big gesso circle outlines and used blue ink with a Prima stamp all over the page. There is lots of mist and paint on here too.

I made the chipboard frame for the photo, and also built up the layers of paper and embellishments around the photo. My two favorite things on here are the bright Prima yellow flower with the blue button and thread shown here and the bright yellow fabric sticker at the top of my photo by American Crafts. I really love the way the Pink Paislee Artisan piece looks over my orange flower too.

The last layout I'm going to share with you today I made for a competition, though I never really got around to sending it in. This next one has some similarities to the layout about although overall they are very different.


Such Googly Eyes

Another custom background though thankfully this one was finished and dry within just a few hours and not nearly a week... LOL!!! I've used mainly Echo Park Paper Co, American Crafts and Studio Calico.

A green paper clip from woolworths and another Artisan element from Pink Paislee.
As you can see I've scrapped and dabbed gesso randomly along the edge of embellishments and papers here as well. It really adds texture and dimension and can help add to that distressed feel.

I couldn't resist another yellow flower I love these so much and I also added a flower from Prima that I had spilled ink on and never bothered to use, It's now all blue instead of cream but looks great on this page.

As you can see I've layered calico and bakers twine behind my photo before adding a frame on top layered with arrows a badge and other embellishments. I have some more pinwheels on here that I made including a really cute miniature one that was very fiddly to make!!
That's it for today but I'll have some more to share with you early next week including some never before seen work and a tutorial on one one my new pages. Hope you had fun today and found some great ideas and inspiration. Thanks for stopping by and I hope you visit again soon. Have a great weekend!!!!
Subscribe to:
Posts (Atom)