
Here is the sketch from 13 @rts:
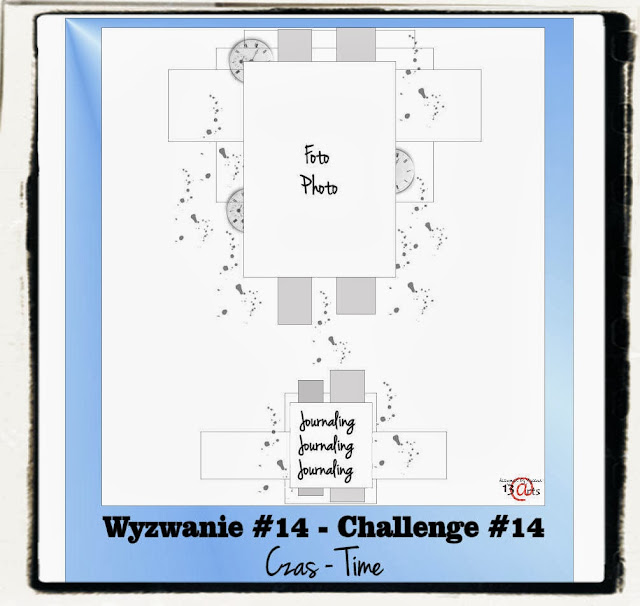
My Interpretation of the sketch:
'Mommy's Boy'

For the background I have used a variety of media including gesso, texture paste with a mask, green felt tip pen, watercolor paints and led pencil. As you can probably tell from the direction of my gesso and paint drips, I actually prepared the layout around the other way, turning it this way only after the background was complete. If you would like to see how I achieved this background, then please keep reading as I have prepared a quick tutorial for you further into this post.
Some details:

I have used almost entirely Prima products for this layout, excluding the base paper which you can only see the thin border of at the back, twine, thread, pegs and paper clip, media products, and of course I couldn't resist adding that cute little Bo Bunny Moustache to the page.

Part of the challenge was to include the word 'time' somewhere on the layout. I have chosen to include it in my journaling which says,
"Every time I look at you my heart melts with love for you. I feel so blessed to be your mother and I know that no matter what you will always be my little angel. I will always love you."

When I was creating my embellishment clusters, it felt like there was something missing. I knew immediately that I needed to add some smaller elements for balance. I was devastated to discover I had completely run out of all my small paper roses. Going through my stash to see if there was anything else I could use I came upon two of my old Prima Aria vines which I recently recycled of an old layout that my son decided to draw on. At first I didn't think they would be much help, but after a moment or two thinking about it I decided 'Why not cut the little flowers off the vine, and use them individually on the page'. As you can see I gave this a try and I am absolutely thrilled with the result. I feel it gives my page a little something extra and helps it stand out a little more.

I am absolutely loving all these metal bits and pieces from Ingvild Bolme at the moment.... This was the first time I have ever been fortunate enough to purchase them as it's the first time our local store has had any in stock. They rarely have any Prima in store and the few times they do it's usually only flowers, so I was very excited to discover these in the store! Another new favorite would have to be Prima's wood icons. How stunning are these flowers!! I will definitely have to see about my store ordering some more in a bigger variety.

Behind my photo I have added some calico which has been frayed. I decided this time to add a little extra detail by hand sewing across the top and the bottom of the photo before framing it with various twines. I have added the pegs (there is a second small one beneath the rose) to help keep it secure.

To finish off my page I tucked in behind my layers some messy thread, which I glued in place when I was happy with the position, and dry brushed some gesso over my embellishments to add some uniformity to the layout and to help tie it all together.
Here is how I created the background:

1. Scrape some white gesso onto your page, then using a mask of your choice, use a palette knife to randomly add texture paste. Remove the mask and allow to dry.

2. This step is quite time consuming and if you want you can skip this one and just continue with step 3, though I personally love the effect this step gives. Taking a felt tip fine liner pen (I have used a light green), outline all of your masked area. When this is done start to color them in. I recommend doing this in a grid like pattern, leaving at least every second one uncolored, though still outlined. If you wish near the edges where your masking stops you can leave some small areas completely uncolored. When you are done, wet a paint brush and 'paint' over your penned in areas with water. Because you have colored on top of gesso/texture paste the ink will just sit on the surface, without actually soaking in, this will allow you to move the ink around with the paint brush. When you have finished you layout should look something like this....


3. Next I have decided that I want a little bit more color in some areas and some paint drips as well so I have added some watercolor to the page, tilting to allow drips. Play around until you are happy with the way this looks. Use a very wet fan brush completely covered in watercolor paint to add lots of small paint flicks to your layout.
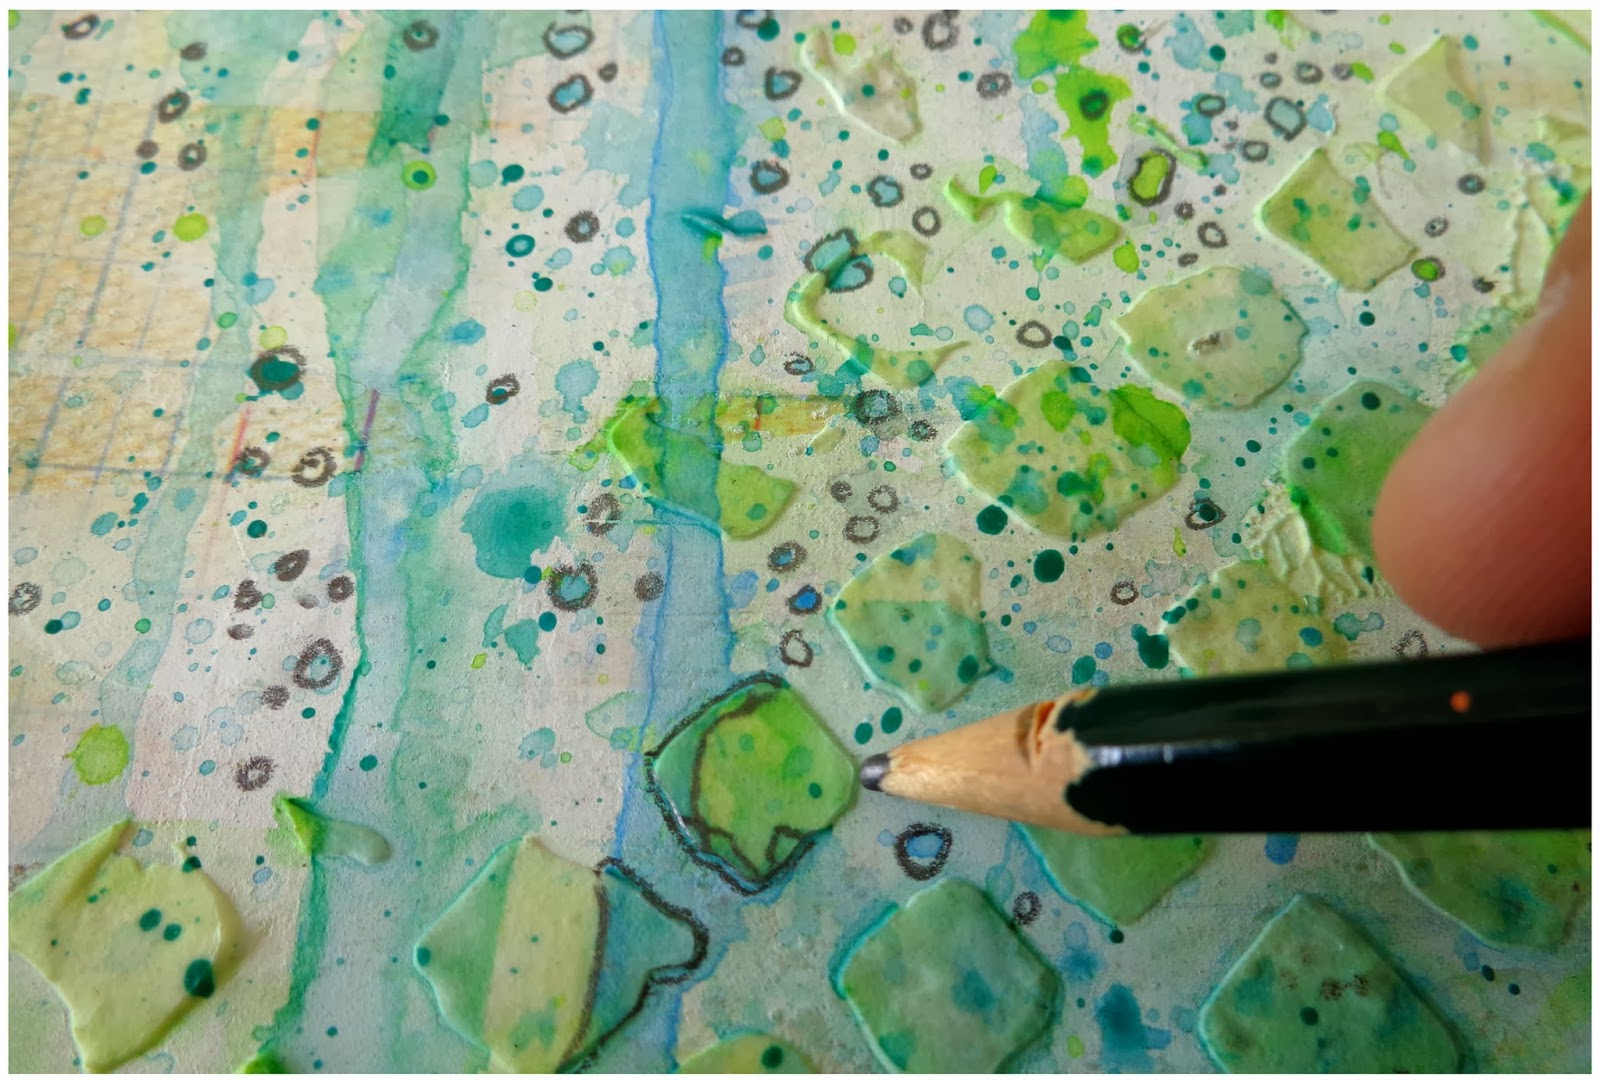
4. When your paint is dry take a lead pencil and randomly outline some of your masking that has been hidden with the paints, though take care not to outline areas where the pen detailing is still very noticeable. In the areas you outline with pencil also use to draw a line separating any differing colors. Finally, use your pencil to outline some of the paint splatters as well as draw your own little circles and spots like so.

5. When you are happy with how your background looks, add a little stamping. I have used a kaisercraft texture stamp to add little triangles, followed by my fave Prima stamp around the edges. I tested how this stamp would look in an area of the page I had planned to cover which you can see in the photo below.

6. Finally, trim about a half a centimeter off each edge of your page and distress. I have chosen to add some little tears as well. Then cover the entire back of the paper with some double sided tape. Select a piece of paper to stick it to and gently smooth in down starting in the top corner and working your way down. This will eliminate any warping and wrinkles your paper might have, giving you a nice flat surface to work on. Complete your page by adding papers, photos and embellishments. I have chosen to turn my background around once so that the drips are horizontal on the paper.
Once again, here is the finished layout:
That's all from me today.... I hope you have found something here to inspire you, and that my little tutorial was helpful to anyone who was curious about my background. Thankyou 13 @rts for such a fabulous sketch to work with and the opportunity to participate in this challenge. I'll be back sometime tomorrow with my newest creation from CSI so please pop back then. Hope you are all having a great Australia Day for us Aussies, and that everyone else is having a fantastic weekend!!
WOW! It's REALLY amazing project! Thanks for sharing the way how you've created it :) Thank you for playing along with 13 arts :)
ReplyDeleteREALLY impressive work! I love it!! Thanks for joining along with 13arts!!xx
ReplyDeleteI love it! That colors, background, and this sweet photo :)
ReplyDeleteLovely page and a sweet photo, thank you for joining 13 arts!
ReplyDeleteBeautiful layout! Love all the texture and inky goodness! Thanks for joining along with 13arts!
ReplyDelete