
Hi everyone!!! I hope you all had a wonderful weekend and are having a great start to the week!!! In my last post for 13 Arts I shared with you a little on Analogous Color Schemes, and explained how a color wheel works.
This week I want to share with you a little about Complementary Colors.
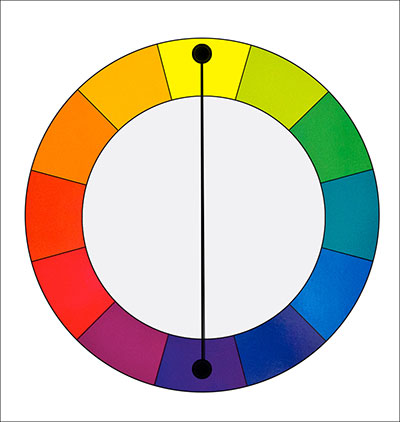
Complementary Colors are when we use 2 colors located directly opposite one another on the color wheel.Complementary colors can create visually exciting effects, and is fantastic if you want something to really pop out, but you need to be careful not to overdo it. It works best when you use one color to dominate and the second to accent.
This week I have made a card with a Step-by-Step Tutorial based on the complementary colors shown here in this color wheel, Yellow and Violet.
'Happy Birthday Nanny'

It is coming up on my grandmother's 76th birthday in a couple of weeks so I made this card for her. I have chosen Yellow to be my main Color, adding a Purple feature in the center of the card with a few hints of purple in the background to blend it together..
Some Details:


Step-By-Step Tutorial:

Step 1: I have cut a piece of yellow paper from the Color Basic Collection to fit the front of my card, then used my palette knife to spread gesso onto the paper. When the Gesso was dry I have sprayed the paper with Pastel Yellow and Pastel Lime Mists, tilting it a little both up and down to get a few drips running both ways down the paper. Dry it with a heat gun.

Step 2: I have used Black Archival Ink to stamp some leaves onto my card, then I have placed my Heart Stencil from the Starlight Collection upside down on my paper, spreading modelling paste through before drying with a heat gun until it puffs up.

Step 3: I have mixed some Vivid violet Paint with water on my craft mat then painted it in the center of my background adding more water as I go, once again tilting for drips, and this time flicking the extra paint off my brush. I have then torn a thin strip of calico and pulled threads loose around the edges, gluing it to my background length ways.

Step 4: I have attached a loose circle of white cord to the middle of my background then added some yellow flowers.

Step 5: Using foam tape I have attached a small piece of purple paper from the Mental Vacation Collection above my yellow flowers and twine circle. I have then painted a chipboard frame white with Gesso, layering it on top of the smaller piece of paper, before finishing with a purple flower.

Step 6: Brush the tips of all the flowers with Gesso then randomly spray the flowers, papers, and frame with some more of the Pastel Yellow and Pastel Lime Mists.

Step 7: Use Gel Medium to add some Natural Purple Mica Flakes and Yellow Sand Colored Grit. Write your sentiment on a piece of white card using a Gold Gel pen and secure it just above the large flower in the middle. Finish off by securing your paper to the front of your card, letting the corners roll up a little.
That's all from me today. I hope you have enjoyed my post!!
13 Arts products used:
Color Basics Collection - 'Yellow Sand' Paper
Mental Vacation Collection - 'Hallerbos' Paper
Starlight Collection Mask - Hearts
Ayeeda Paint - Vivid Violet
Ayeeda Mist - Pastel Yellow
Ayeeda Mist - Pastel Lime
Natural Colored Mica Flakes - Purple
Colored Grit - Yellow Sand
What a beautiful card! Thanks for showing us how it was made. I read the post about the color wheel and now an example of complementary colors. Thanks very much.
ReplyDeleteYour work is mind blowing TFS
ReplyDeleteBeautiful card! Love the colors together and thanks for the step by step too!
ReplyDeleteReally gorgeous card - great showcase of how to use the complementary colours, too.....love how you layer up on your work. Exquisite:):)
ReplyDeleteC'est super beau ! Bravo
ReplyDelete